本文首发于 2018-09-16 21:35:02
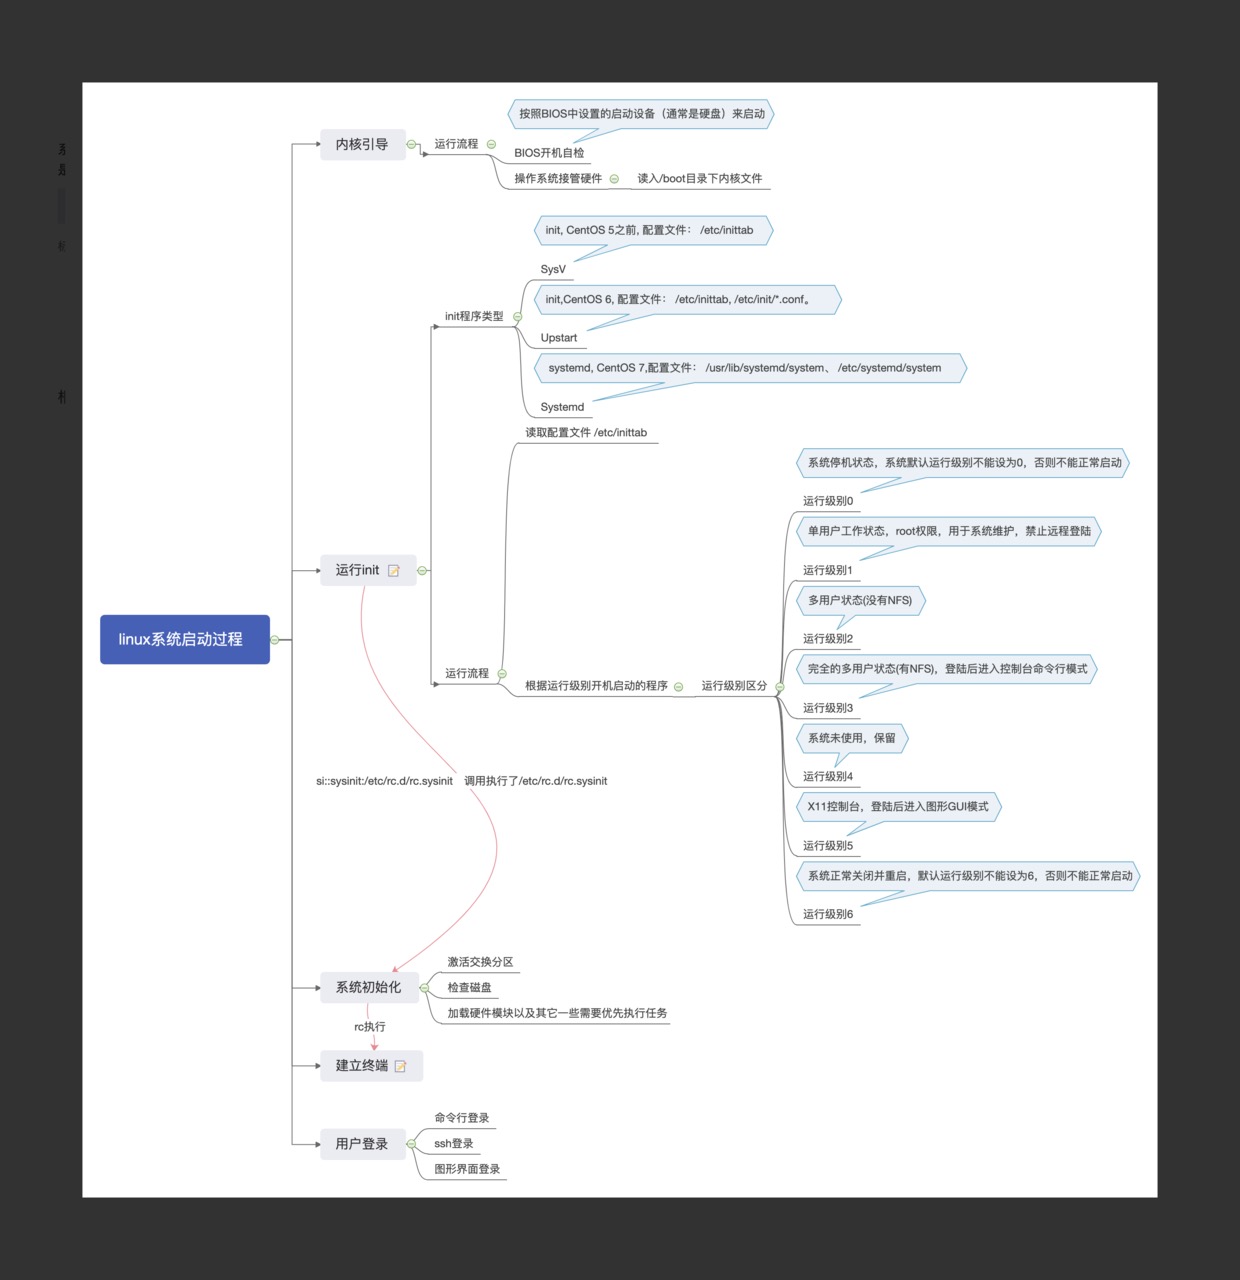
总启动流程
一般来说,所有的操作系统的启动流程基本就是:

总的来说,linux 系统启动流程可以简单总结为以下几步:
- 开机 BIOS 自检,加载硬盘。
- 读取 MBR,进行 MBR 引导。
- grub 引导菜单(Boot Loader)。
- 加载内核 kernel。
- 启动 init 进程,依据 inittab 文件设定运行级别
- init 进程,执行 rc.sysinit 文件。
- 启动内核模块,执行不同级别的脚本程序。
- 执行/etc/rc.d/rc.local
- 启动 mingetty,进入系统登陆界面。
linux 系统安装时,如果要想设置开启启动项,可以:
开机到 BIOS 提醒界面,按键 F11(Dell 服务器的做法)进入 BIOS 设置 BOOT MENU,继而设置启动项:硬盘 HD 启动,光盘 CD/DVD 启动,还是 U 盘 USB 启动。
详细流程
下面就 linux 操作系统的启动过程做一详细解析记录。
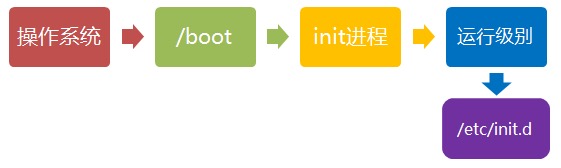
1. 加载内核
操作系统接管硬件以后,首先读入 /boot 目录下的内核文件。

1 | [root@bastion-IDC ~]# ll /boot/ |
2. 启动初始化进程
内核文件加载以后,就开始运行第一个程序 /sbin/init,它的作用是初始化系统环境。

由于 init 是第一个运行的程序,它的进程编号(pid)就是 1。其他所有进程都从它衍生,都是它的子进程。
3. 确定运行级别
许多程序需要开机启动。它们在 Windows 叫做”服务”(service),在 Linux 就叫做”守护进程”(daemon)。
init 进程的一大任务,就是去运行这些开机启动的程序。但是,不同的场合需要启动不同的程序,比如用作服务器时,需要启动 Apache,用作桌面就不需要。Linux 允许为不同的场合,分配不同的开机启动程序,这就叫做”运行级别”(runlevel)。也就是说,启动时根据”运行级别”,确定要运行哪些程序。

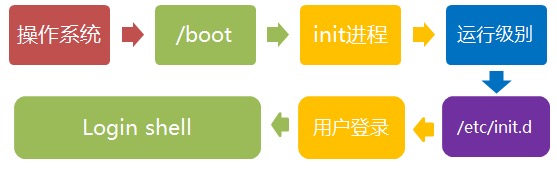
Linux 预置七种 init 运行级别(0-6):
0:关机模式 (相当于 poweroff)
1:单用户模式
2:无网络支持的多用户模式
3:有网络支持的多用户模式(也就是文本模式,工作中最常用的模式)
4:保留,未使用
5:有网络支持的 X-windows 支持多用户模式(也就是桌面图形模式)
6: 重新引导系统,即重启(相当于 reboot)
init 进程首先读取文件 /etc/inittab,它是运行级别的设置文件。
如果打开它,可以看到第一行是这样的:
1 | [root@bastion-IDC ~]# cat /etc/inittab |
initdefault 的值是 3,表明系统启动时的运行级别为 3。如果需要指定其他级别,可以手动修改这个值。
那么,运行级别 3 有哪些程序呢,系统怎么知道每个级别应该加载哪些程序呢?
答案是每个运行级别在/etc 目录下面,都有一个对应的子目录,指定要加载的程序。
1 | /etc/rc0.d |
上面目录名中的”rc”,表示run command(运行程序),最后的 d 表示directory(目录)。下面让我们看看 /etc/rc3.d 目录中到底指定了哪些程序。
1 | [root@bastion-IDC ~]# ll /etc/rc3.d/ |
可以看到:
字母S表示Start,也就是启动的意思(启动脚本的运行参数为 start)。如果这个位置是
字母K,就代表Kill(关闭),即如果从其他运行级别切换过来,需要关闭的程序(启动脚本的运行参数为 stop)。后面的两位数字表示
处理顺序,数字越小越早处理,所以第一个启动的程序是 motd,然后是 rpcbing、nfs……数字相同时,则按照程序名的字母顺序启动,所以 rsyslog 会先于 sudo 启动。这个目录里的所有文件(除了 README),就是启动时要加载的程序。如果想增加或删除某些程序,不建议手动修改 /etc/rcN.d 目录,最好是用一些专门命令进行管理(参考这里和这里)。
4. 加载开机启动程序
前面提到,七种预设的”运行级别”各自有一个目录,存放需要开机启动的程序。不难想到,如果多个”运行级别”需要启动同一个程序,那么这个程序的启动脚本,就会在每一个目录里都有一个拷贝。这样会造成管理上的困扰:如果要修改启动脚本,岂不是每个目录都要改一遍?
Linux 的解决办法,就是七个 /etc/rcN.d 目录里列出的程序,都设为链接文件,指向另外一个目录 /etc/init.d,真正的启动脚本都统一放在这个目录中。init 进程逐一加载开机启动程序,其实就是运行这个目录里的启动脚本。
下面就是链接文件真正的指向:
1 | [root@bastion-IDC ~]# ls -l /etc/rc3.d |
这样做的另一个好处,就是如果你要手动关闭或重启某个进程,直接到目录 /etc/init.d 中寻找启动脚本即可。
比如,我要重启 iptables 服务器,就运行下面的命令:
1 | [root@bastion-IDC ~]# /etc/init.d/iptables restart |
/etc/init.d 这个目录名最后一个字母 d,是 directory 的意思,表示这是一个目录,用来与程序 /etc/init 区分。
5. 用户登录
开机启动程序加载完毕以后,就要让用户登录了。

一般来说,用户的登录方式有三种:命令行登录、ssh 登录、图形界面登录。这三种情况,都有自己的方式对用户进行认证。
1)命令行登录:init 进程调用 getty 程序(意为 get teletype),让用户输入用户名和密码。输入完成后,再调用 login 程序,核对密码(Debian 还会再多运行一个身份核对程序/etc/pam.d/login)。如果密码正确,就从文件 /etc/passwd 读取该用户指定的 shell,然后启动这个 shell。
2)ssh 登录:这时系统调用 sshd 程序(Debian 还会再运行/etc/pam.d/ssh ),取代 getty 和 login,然后启动 shell。
3)图形界面登录:init 进程调用显示管理器,Gnome 图形界面对应的显示管理器为 gdm(GNOME Display Manager),然后用户输入用户名和密码。如果密码正确,就读取/etc/gdm3/Xsession,启动用户的会话。
6. 进入 login shell
所谓 shell,简单说就是命令行界面,让用户可以直接与操作系统对话。用户登录时打开的 shell,就叫做 login shell。
Linux 默认的 shell 是 Bash,它会读入一系列的配置文件。上一步的三种情况,在这一步的处理,也存在差异。
- 命令行登录:首先读入
/etc/profile,这是对所有用户都有效的配置;然后依次寻找下面三个文件,这是针对当前用户的配置。
1 | ~/.bash_profile |
需要注意的是,这三个文件只要有一个存在,就不再读入后面的文件了。比如,要是
~/.bash_profile存在,就不会再读入后面两个文件了。
- ssh 登录:与第一种情况完全相同。
- 图形界面登录:只加载
/etc/profile和~/.profile。也就是说,~/.bash_profile不管有没有,都不会运行。
7. 打开 non-login shell
老实说,上一步完成以后,Linux 的启动过程就算结束了,用户已经可以看到命令行提示符或者图形界面了。但是,为了内容的完整,必须再介绍一下这一步。
用户进入操作系统以后,常常会再手动开启一个 shell。这个 shell 就叫做 non-login shell,意思是它不同于登录时出现的那个 shell,不读取/etc/profile和.profile等配置文件。
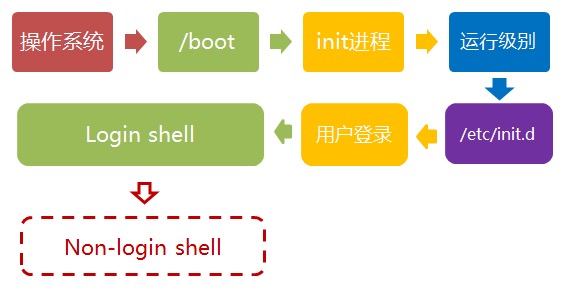
non-login shell 的重要性,不仅在于它是用户最常接触的那个 shell,还在于它会读入用户自己的 bash 配置文件 ~/.bashrc。大多数时候,我们对于 bash 的定制,都是写在这个文件里面的。
你也许会问,要是不进入 non-login shell,岂不是.bashrc 就不会运行了,因此 bash 也就不能完成定制了?
事实上,Debian 已经考虑到这个问题了,请打开文件 ~/.profile,可以看到下面的代码:
1 | if [ -n "$BASH_VERSION" ]; then |
上面代码先判断变量 $BASH_VERSION 是否有值,然后判断主目录下是否存在 .bashrc 文件,如果存在就运行该文件。
第三行开头的那个点,是 source 命令的简写形式,表示运行某个文件,写成”source ~/.bashrc”也是可以的。
因此,只要运行~/.profile文件,~/.bashrc文件就会连带运行。但是上一节的第一种情况提到过,如果存在~/.bash_profile文件,那么有可能不会运行~/.profile文件。解决这个问题很简单,把下面代码写入.bash_profile就行了。
1 | if [ -f ~/.profile ]; then |
这样一来,不管是哪种情况,.bashrc都会执行,用户的设置可以放心地都写入这个文件了。
Bash 的设置之所以如此繁琐,是由于历史原因造成的。早期的时候,计算机运行速度很慢,载入配置文件需要很长时间,Bash 的作者只好把配置文件分成了几个部分,阶段性载入。系统的通用设置放在 /etc/profile,用户个人的、需要被所有子进程继承的设置放在.profile,不需要被继承的设置放在.bashrc。
顺便提一下,除了 Linux 以外, Mac OS X 使用的 shell 也是 Bash。但是,它只加载.bash_profile,然后在.bash_profile 里面调用.bashrc。而且,不管是 ssh 登录,还是在图形界面里启动 shell 窗口,都是如此。
附:启动流程的思维导图
欢迎关注我的微信公众号【数据库内核】:分享主流开源数据库和存储引擎相关技术。

| 标题 | 网址 |
|---|---|
| GitHub | https://dbkernel.github.io |
| 知乎 | https://www.zhihu.com/people/dbkernel/posts |
| 思否(SegmentFault) | https://segmentfault.com/u/dbkernel |
| 掘金 | https://juejin.im/user/5e9d3ed251882538083fed1f/posts |
| CSDN | https://blog.csdn.net/dbkernel |
| 博客园(cnblogs) | https://www.cnblogs.com/dbkernel |